Blogging can be time consuming. It’s true. The days of my thinking my Blog was no more than a hobby are long gone. This is my passion but it is also a job. I get up with a list of things to do and normally go to bed while making another. Learning ways to be effective in what I do with the time I have to do it has been key to my success.

For Your Blog
CoSchedule PlugIn
Coschedule is a PlugIn available for WordPress that allows you to have an option right within your Dashboard to schedule and create content shares for your posts. CoSchedule offers both Free and Paid versions. Choosing which one you want is all based on the needs you have for your site. I’m currently a paid user because the benefits for me and my site are well worth the extra monthly investment.

I have come to rely on CoSchedule to help me not only blog better but save time while doing it. The fact that I am able to schedule social share from within a post means I don’t have to spend the extra time to log in somewhere different, pull the information from the post or even figure out the best time to post. CoSchedule does it all!
CoSchedule from Garrett Moon on Vimeo.
One of the biggest benefits I’ve gained from adding CoSchedule into my set of tools for Blogging is the ability to schedule out my evergreen content for days, weeks or even months in advance. This means I can write a Back To School post today and have it shared not only now but during next year’s Back To School season as well.
Scheduling my post shares immediately helps me avoid forgetting to do it later and missing out on the opportunity to reintroduce my content. CoSchedule also selects the Best Time to Share for me based on my audience. Again, one less thing for me to put time into figuring out.
CoSchedule offers so many different options that I use daily I will definitely create a follow up post to focus on it alone with more details on how I use CoSchedule. Yet I knew sharing the tools I use the most in Blogging had to include CoSchedule at the very top of that list!
Canva
I’m sure you’ve heard of Canva but just in case you haven’t. Canva is an online resource that provides stock images as well as image design and edit options. From text, overlays and more you can create images to support your content in just a few clicks.
My love for Canva as a tool for Blogging is my ability to find images for nearly any theme, topic or idea and know that I don’t need to worry or be concerned about rights to use them. No one wants to risks their entire site over an image!
Canva gives the option to use FREE images or purchase those you want for as little as $1 for a 24 hour edit time, $10 for multi-use or $100 for extended use. You can even crate something like a ‘tab’ and get 11 $1 images for $10.
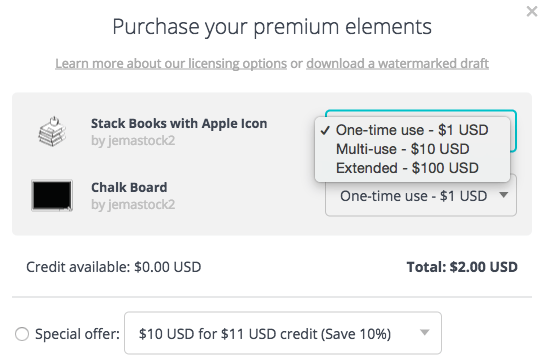
Creating content that is visually engaging and stimulating is such a major part of drawing an audience in to your Blog. That’s why I count Canva as one of the tools I count on the most to help me Blog effectively.
On-The-Go
Evernote
Working from anywhere at anytime is such a major part in making sure I use my time wisely as a Blogger. There are days when I am not able to stay at home to create – life demands my presence and that means sometimes I have to Blog on-the-go! That’s where Evernote steps in . . .

I’ve mentioned the awesomeness that is Evernote before and it definitely needs to be including in this post because Evernote gives me so many options to maintain my blog, create, keep ideas and even share files while on-the-go. Evernote is available as an App and Online Resource. This means I can access it from my mobile device, table, laptop – ANYwhere!
Likes most tools, Evernote offers both Free and Paid options and like I always advise you need to determine which best fits your needs and purpose for using it. Currently I am still using the Free version. I have not run into any issues with data space or usage and for me it still works best.
I use Evernote to save things like notes I need to access when away from my laptop as well as information I know I use often but want to have in a secure place. The Evernote App allows for secure use with either a password or fingerprint recognition so you can feel secure saving and accessing just about anything.
Some examples of the things I save to my Evernote include my Facebook Group activity, Author Bios, Disclosure language, regularly used Hashtags and so much more! I never have to worry about finding something or needing to wait until I can get back to my computer because Evernote gives me all I need wherever I need it to be.
<
p style=”text-align: right;”>Try 1 FREE Month of Evernote Prime!
In Your Feed
Link.tree
Okay folks. This one is a pretty recent discovery. I think I’ve been using Link.tree for about 4 months and I am Loving It!!

Link.tree allows you to take ‘link in profile’ to an entirely new level! I can not even tell you how many times I have become frustrated with not being able to send my Instagram audience directly to the content related to an image. Then if you do choose to add the link to the one URL option available in your profile you can only do it once and for one image. What a waste of time! Until now that is.
Thanks to link.tree I can take that valuable URL option in my Profile and put it to good use. Link.tree assigns a URL which will take your audience to a customized page where you can list Titles and URLs for your Brand, Blog and Images. Here’s what mine looks like:
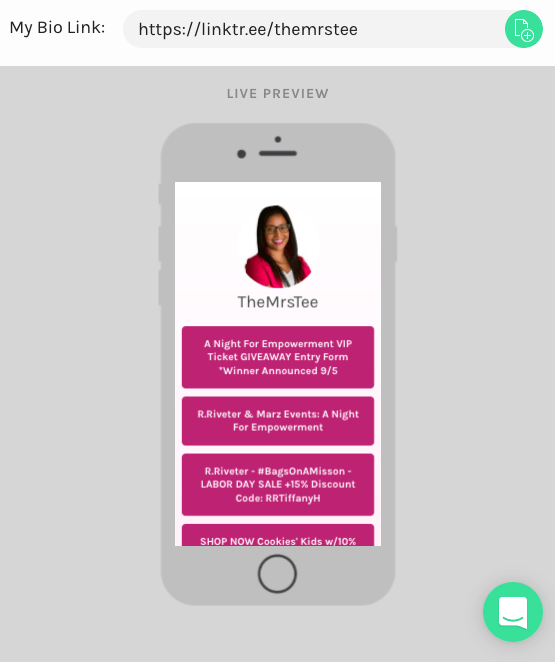
Set up is super easy because Link.tree connects directly to your Instagram account. If you have more than one account (as I do) it will connect to the one you are currently logged in to. Once logged in you can edit and adjust your links as you like. You can move them and rearrange the order as well as customize the look of your Link.tree destination. Another bonus of Link.tree is it is viewable not only on mobile devices but on laptops and desktop as well so no matter where my audience clicks from they can always see my content.

Like many of the tools I use the most, Link.tree has both a Free and Paid option. I have opted for the Link.tree Pro which is $6/month. It allows be to have a vanity URL where I can identify my Brand name as well as more custom options for color, design and layout. I also have access to daily reports of my link traffic.
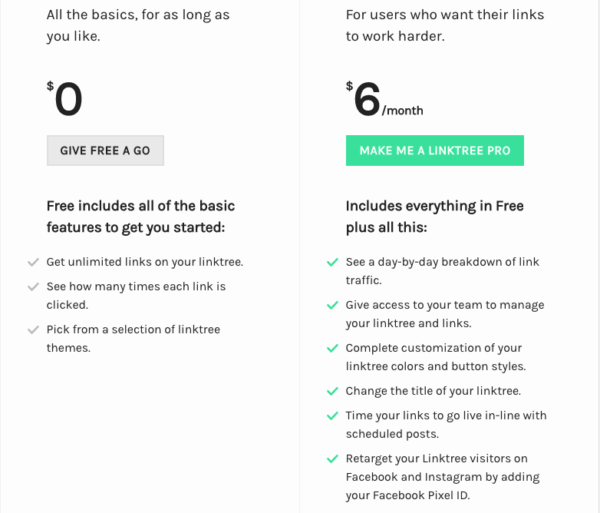
For me this is an investment worth making. Not only does Link.tree give me more options with how to lead my Instagram audience to my content but it saves me time because I no longer need to switch out 1 URL link for another over and over.
On The Web
Yoast SEO
My last tool for Blogging and time management is one that helps me tackle SEO from within my posts, as I write and with the guidance I need to make sure I get it right – the first time.
Yoast SEO installs directly to your WordPress site and is accessible through your Dashboard. It is also added directly to your post creation page. This saves you the time of adjust your SEO in a different area and coming back and forth between your post.
One of the things I love the most about the Yoast SEO Plugin is the ability to see in a simply way if my post meets the basic standards for correct SEO. It’s a Red, Green Yellow system. Much like a traffic signal. Green is good to go, Yellow means wait and Red means stop. For me I aim for a Green light before hitting publish on any post.
Getting to a Green light is as easy as following to prompts within the Plugin’s analysis section. This area addresses things like Meta Descriptions, Images, Links, Keyword, Title and more! All things I could easily forget or neglect if I was left to try and keep track of them on my own.
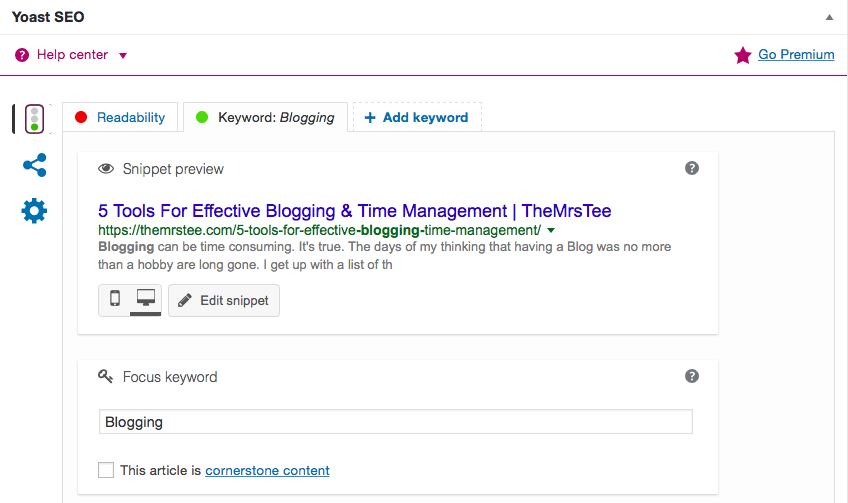
In recent years, SEO has become one of the biggest requirements for a blog to be certain that your content is not only seen but shared, supported and populated ‘on the web’. Thanks to Yoast I can be certain each of my posts are web ready in just a few steps.
Yet Yoast doesn’t stop there. I can also check the Readability (I wasn’t done editing when I captured the above screenshot) as well as select my focus keyword, the snippet which shows under my post in web searches as well as get a glimpse at how they will appear across different devices.
Yoast offers both Free and Paid options and if you’ve read this far you know I’m going to say determining which is best for you means truly understanding and weighing which will not only fit your budget but give you the best benefits for your blog.
P.S.
As I gathered these 5 tools I realize how much each of them offer – so much more than I could fit into this one post. So stay tuned because I will be sharing a post dedicated to each tool on it’s own. In those posts, I will share not only why I love CoSchedule, Canva, Evernote, Link.tree and Yoast but also the How To of how I use each one to help create, maintain and promote my Blog while saving time and staying effective.

- The ‘Dirt’ on Dirty Whiskey Craft Cocktail Bar – August 6, 2021
- I Never Went To Prom – Will A Fashion Show Do? – May 1, 2021
- Cape Fear Regional Theatre – Best In The House – May 1, 2021


 Thanks so much Kimberly! It was great to see your name in the comments!





Leave a Reply